After posting about the hoop stand and the QSnaps, some conversation was generated about the ease and nonease of using QSnaps. Some embroiderers say that they have difficulty removing the QSnaps when they have to reposition the hoop. I’ve never thought of that, and I think I know why.
Here is how I use QSnaps.
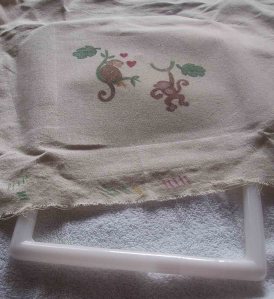
I place the hoop frame under the fabric to be embroidered.
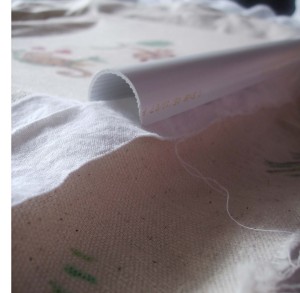
Place a strip of fabric strip, maybe a light muslin, over top of the first side of the QSnap that is under the fabric to be embroidered.
Lay the QSnap down on top of that fabric strip.
Center the QSnap over the fabric strip.
Snap the QSnap into place.
Here is the first side snapped into place over the protective fabric strip.
Then, moving to adjacent edge, lay another protective fabric strip over the second edge of the QSnap frame.
Lay the QSnap down on top of that fabric strip. Center the QSnap over the fabric strip.
Snap the QSnap into place.
Here is the second side done. The protective fabric strips do not get caught by the next QSnap. Each hangs freely in the corners.
Then, moving to adjacent edge, lay another protective fabric strip over the third edge of the QSnap frame.
Lay the QSnap down on top of that fabric strip. Center the QSnap over the fabric strip. Snap the QSnap into place.
Then, moving to the last edge, lay another protective fabric strip over the fourth edge of the QSnap frame.
Lay the QSnap down on top of that fabric strip. Center the QSnap over the fabric strip. Snap the QSnap into place.
Here it is with all sides of the QSnap snapped into place. You can see all the edges of the protective fabric strips as they sit under the QSnap edges.
————————————–
To tighten the fabric and pull it taut, grab the edge of the QSnap…
and gently “twist” outward, away from the center. The material tightens right up.
Here is the fabric waiting for embroidery all taut in the QSnap hoop.
————————————–
To remove the QSnap edges, grab the strip of protective fabric…
and pull away from the QSnap frame in an outward direction. The QSnap edges come right off with no problems.
I hope this helps to explain some of the mysteries of the QSnap quilt/embroidery hoop and its tight, snap down edges.
Your life needs fun. Go ahead and have fun!
———–Helpful Information——–
* I bought my QSnaps from Fiddlesticks – Hawaii
Find QSnap information (click here)
Find post Embroidery Tools- QSnaps and Embroidery Stand/Hoop Stand (click here)


 Stumble It!

This is fantastic! I recently purchased my first QSnap, and I’ve had some troubles getting comfortable with it. This is so nice to see a step-by-step photo tutorial of how to use it. And I love the tip of using the strips of protective cloth to remove the frame clips at the end. Brilliant! Thank you! 🙂
AverageJaneCrafter,
You are most welcome! I’m so glad that the post could help you. Thank you for the kind words and thank you for visiting. I hope you drop by often.
smiles,
alicia in Hawaii
Thank you for demonstrating getting the q-snaps back off. I bought one and with just fiddling was pondering how to get them off when you wanted to remove your work. I was thinking along the line you indicate but it is good to see in black and white from someone else exactly how. Thank you so much for the idea!
Hi Marysewfun,
I’m so glad that all the pictures from start to finish could help you with your QSnaps. It was my goal to post an entry that would leave stitchers and embroiderers worry-free of their QSnaps.
Thanks for visiting and commenting.
smiles,
alicia in Hawaii
I love all your helpful hints and experience sharing! This may seem like a very silly question but here goes. I am working on a project; 14ct Aida, 15×18. I’m not quite sure what size QSnap should I buy? I have searched the web for hours but I can’t find anything that speaks to that. Would it be an 11×11 or 17×17……? Thanks for your help!!
Sheila
Thank you!!
So simple but super effective. Many thanks for the great photos. This is simpler than trying to wrap the inner frame with batting or twill tape, as we do with wooden hoops.